
Yesterday I had a friend ask me for help editing a movie poster for Chronicles of Narnia. This will be a long and in-depth tutorial that will focus a lot on replicating existing text.

What my friend wants me to do, is use a scan of the movie poster he bought and change the text. The movie poster will say "For Narnia," "And For Aslan."
Here are the basic things we will be doing:
Extract existing text
Recreate text
Take out unnecessary text
Basic image adjustments
Let us begin!
Step 1 - Prep image and layers

Step 2 - Isolate the Narnia text

It seems that back in the day, the scissor tool in Gimp was pretty buggy (or maybe I was), but now it is one of my favorite selection tools because of how precise you can select.

Select the text. This will take a looooong while.

There will be areas that you will have to add or subtract selections from (like inside the As). Your CTRL and shift keys will allow you to do this when you are making the selections.

Once you have the text selected, invert the selection (CTRL+I) and press delete. Make sure to add an alpha layer to the layer first.
I like to add a white layer so I can actually see what I am working with.

Here is a close up. Not perfect but good enough. We will add a drop shadow later that will cover up most imperfections of the selection.


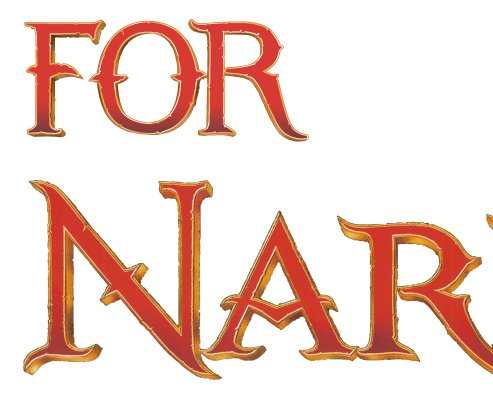
We need to create the word "FOR." I did a Google search, and luckily, there is a font for Chronicles of Narnia. This will make things a bit easier. Most really popular movies will have fonts created for them that you can download.

Select the text and add a gradient. I used the eye dropper to get the colors I needed.


We will do a gold fill around the text.

We will do a smaller border and do a white fill for an outline.

I used the eraser tool and turned the opacity to manually erase some of the white. This gives it a more natural look.

Copy the original text and change it to gold. You will place this in a layer below the red text. This will allow us to make the text 3D.


Next I used the spray brush tool to add some back and white paint for shadows and highlights.

Add some HSV noise.

Distorts>Emboss Do a bumpmap

Now the text is pretty close to the original.

Flatten all the layers you used to make the text so you can do more editing.

Make a selection of text and use the iWarp plugin to warp some of the edges to make it look chipped and worn.
I used the smudge tool a bit until I got it to look like the original text.
Step 4 - Recreate the other text

We will do this text a much quicker way. It won't be exact copy, but it will be pretty close. We are trying to go for a chrome look. First, find a font that looks pretty similar.


Do a bumpmap Distorts>Emboss

Tweak it until it looks pretty close.

I edited the curves and levels as well.

Step 5 - Take out existing text

One way to do this would be to select the text you want to get rid of and go to Map>Resynthesize... Because my image was so large though, this crashed the Gimp every time. Guess I will do it the old fashioned way... Clone tool.

Step 6 - Retouches and text placement

With all the text gone, we can adjust the levels some... Often the scanner will cause a loss of colors and levels.

Now place the text.

Highlight the text (or use the path to selection) and add a drop shadow.

New movie poster. You can have it say whatever you want!


Awesome! Thanks.
ReplyDeletereally awesome. Thanks a lot for this tutorial.
ReplyDeleteLots of Gratitude
This one is fabulously looking the great tutorial. And the massive information of this post is extremely looking just fully described about it. This one is extremely one of the unique experienced post about it. Thanks for sharing.
ReplyDeleteThank you for the compliment and for viewing my tutorial. Glad you like it.
ReplyDeleteReally wonderful. I just tried to edit the text using GIMP. It worked pretty good. Thanks guy..You are genius :-)
ReplyDeleteGlad it worked for you!
ReplyDeleteHey, I know this was made forever ago, but I would just like to say, "Wow, amazing!" One thing, though; I would have brought the "AND FOR ASLAN" down a little bit, so that the dark of the cliffs would give it better contrast.
ReplyDelete