For this tutorial I will show you how to make a Christmas card or flier using Inkscape. The end result will be a card that looks like a Christmas Present.
Step 1 - Document Properties
Change the document properties to be the same as the paper you sill be printing from.
I like to set up guidelines for dividing it up; this way I can print many fliers on one sheet of paper. This can also be the last step, but it is a good idea to start with the dimensions for how you will want it printed.
Step 2 - Set the background
Create a rectangle and do a gradient
Create a new layer. Name it "texture" or something similar.
Do a Google search for "paper texture" and place that over the bacground (you will want to duplicate the background and move it to the texture layer)
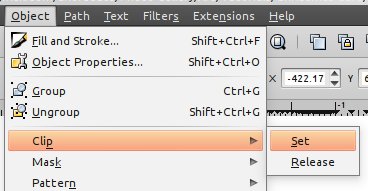
Clip the selection and set the layer mode to screen and turn down the opacity till it looks like wrapping paper with a bit of texture.
Step 3 - Ribbons
Create a rectangle for the ribbon. One horizontal, one vertical.
Create a new texture layer for the ribbons.
Copy the ribbons and add them to that layer. Apply the texture "Rough and glossy."
Open the filter editor and edit the texture so that displacement is turned down all the way. You also can edit the Filter General Settings so that, the filter does not apply beyond the actual shape (or you can just clip the object with another copy of the ribbon.
Apply a vertical motion blur to the ribbon for the vertical ribbon. Horizontal motion blur for the horizontal ribbon.
Turn the layer of the texture to screen.
Create a drop shadow that can go under the ribbon. I find it is easiest to create a new layer for the shadows so that you can place the shadow first, then move the entire layer underneath the ribbon.
Step 4 - Create a bow
Use your pen tool and create the center of the bow as well as a fold in the ribbon.
Create shapes as shown. These will be shadows for the creases in the ribbon.
Fill the objects. For the creases, do a gradient and turn down the opacity.
Copy and place the the ribbon fold till you have something similar to the above picture. I also like to change and move some of the creases to make it look a bit more natural. Also, you can create a shape that is the same as the bow, blur that shape and place it underneath to create a shadow.
Create a long ribbon going from the bow.
Copy the ribbon and change it horizontally (press h). Fill in the color with gradients; add a drop shadow.
Group the bow together (CTRL+G) then place it over the ribbons where they cross.
Step 5 - Add a card
Create a rectangle (you can create a new layer for this). I like to do a yellow/white gradient. You can also apply the paper texture (do the same thing as in step 2). Create another slightly smaller rectangle with no fill, but a black stroke.
Step 6 - Add text
Add whatever text you would like. This can work for a card or flier or invitation.


0 comments:
Post a Comment