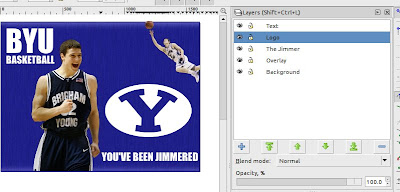
With all the hype BYU's Jimmer Fredette has been receiving, I decided to do a celebrity wallpaper tutorial featuring him using the Gimp. Like most things I do, I always wonder if I could do it in both Gimp and Inkscape. So I decided to try it. This tutorial will show how to remove backgrounds from raster images. I will talk briefly about bitmap traces, and I will also be using many texture filters and layers.
Start a new document and go to Document Properties (Shift+Ctrl+D)
Width = 1600 Height = 1200. This should be large enough for most monitor screens.
Start by using the rectangle tool and create a rectangle that covers the entire page. Use any color you want and no need for a stroke (Edit colors, fills and strokes by opening the Fill and Stroke dialog box [Ctrl+Shift+F]).
I usually copy and paste my original shape so that I have a backup I can use later on that will be the same exact shape.
Apply the Pixel Smear Filter. Filter>Distort>Pixel Smear
Then add the vertical motion blur filter.
Now open the filter Editor.
Under "Effect" scroll down to Gaussian Blur and bump up the Standard Deviation to 30. This lengthens the blur.
Create a new layer and name it overlay. Here I like to go to my original background that I copied and set aside and copy it again. Move it up to the Overlay layer (select the item then press Shift+PgUp). Change the color to be similar but different.
Do a pixel smear on this again. Maybe even a horizontal pixel smear, and drop the opacity down. Set the blend mode to "Darken" and place it over your background.
Now we want to drag and drop a picture of Jimmer. (to find out how I got my photos and logo, please refer to my Gimp tutorial). We can link or embed the photo.
To remove backgrounds for raster images, we would want to use a raster program like Photoshop or Gimp. Since we are only doing this in Inkscape though, I will show you how this can be faked.
Select your pen tool and carefully use it to select the outline of Jimmer.
Now we have Jimmer's shape.
With both the shape you just created and the raster image selected, select Object>Clip>Set
This will clip the image and get rid of the background! (Look; even Jimmer is excited!)
Now for the logo. We could use it as is, OR we could turn it into a vector image. Vector is always going to be the best choice for logos.
With the logo selected, press Path>Trace Bitmap....
With the Trace Bitmap dialog box loaded, select colors and put any number in for Scans. Then press OK.
For most of my bitmap traces I like to do quite a few scans; this way I have different choices for the bitmap trace. In this instance, the icon was large enough that it made no difference. Since I used 3 for scans, you can see I have 3 different objects. After the bitmap trace is done, the objects will be grouped together press Ctrl+Shift+G to ungroup them. You can delete the objects you do not need. Now that your image is vector, you can change it to whatever color you would like.
Place the logo, images and write text.
I like to add a vignette layer. Use another copy of your original background. In your Fill and Stroke dialog box, press the radial gradient for the fill. No stroke.
We will need to edit the gradient.
Press the gradient editing tool.
Press the center mode and change the color to white. Then select either of the outside nodes and change the color to black. It should look like the above image.
Keep on editing the gradient till it looks good.
Now we can add some embellishments to play with filters some more.
Select some text. Copy it (Ctrl+C) then paste it in the same location (Ctrl+Alt+V)
With the new copy selected, apply the filter Filter>Scatter>Airspray.
It will look like this.
Turn the object's opacity down to about 30.
Now for our logo we can apply the Cubes filter or the Bark filter.
For the rest of our text we will apply Filter>Shadows and Glows>Drop Shadow... Use the setting I have in the screenshot above.
That is it! To download or see all of my wallpapers, please go here.
If you would like to try this in the Gimp, go here.


0 comments:
Post a Comment